Wednesday, July 31, 2013

Design Trend: Polka Dots

Polka dots are showing up everywhere in interior design and in fashion.  It can be playful or sophisticated, subtle or over the top.  Whatever way it is used, I am loving it. 

Traditional Bedroom by Dayka Robinson via Houzz

Deborah Gordon of Ollie and Seb's Haus via Emma's Design Blogg


polka dot ceiling

I may or may not have put some polka dots in our living room.  If I did, you know it will lean more toward playful and over the top.

Have you used polka dots in your home yet?

Tuesday, July 30, 2013

Our Floor Plan

I always talk about how small our house is but I never showed a floor plan of the house.  I thought now is a good time to show it so that you can understand how small it really is.


The program I use to create floor plans (Chief Architect), says that the house is 742 square feet.  We do have a full basement that isn't finished and isn't included in the square footage.  I wish it was, but there is asbestos down there.  We do use the basement for storage and the laundry room is down there.  We also have a detached one and a half car garage that is not included on the floor plan.

The bedroom that is to the right of the kitchen is the dog's room/mud room.  It isn't really a bedroom because there isn't a built in closet.  There is also an exterior door in there that leads to our side yard/back yard.

The front door that we use (the entry) is basically in the kitchen.  The stairs to the basement are directly across from the entry.  (It says open below on the floor plan.  I am not sure why, but I know it wouldn't let me put the stairs to the basement there without it saying that.)

There are windows in the bedroom and office, but I didn't put them in on the floor plan because we have furniture in front of the windows.  There is even a window in the bathroom that previous owners covered up with the shower/tub combo.  You can see the window on the outside though and it looks bad because you can see the back of what looks like drywall.  We are going to try to take out the glass and put in a faux curtain to hide it.

I hope this helps you visualize my home when I am talking about what rooms I am working on.  The kitchen, dog's room and office are all done.  I am still working on the living room/dining room and bathroom and the bedroom is getting revamped although it was officially done.  You know how it is.

Monday, July 29, 2013

2013 Home Goals Update

This year is flying by.  I can't believe that we are halfway through 2013 already.  While I was away from the blog and my house for 3 weeks, I thought I should update my home goals list that I posted in January.


Goal #1 Finish the Kitchen - 100% Complete


We still need to add an utensil organizer in a drawer and a pull out system for our garbage and recycling cans.  Decor wise it is technically finished.  I always want to change things up so I may add some more colors to the room.  We will see though.

To Do:

  • Add utensil organizer
  • Add pull out system for garbage

Goal #2 Finish the Office/ Craft Room - 100% Complete


I am still collecting globes (I want 4 more) and I want to add a couple instruments to my "music section".  The closet in this room that I turned into a Hall/Linen closet needs to be organized slightly and I have some labeling to do in there.  Other than that the room is done.

To Do:

  • Organize Closet
  • Do labeling in Closet
  • Finish accessorizing

Goal #3 Finish the Living Room/Dining Room - 60% Complete


Here is the living room a couple weeks ago before we moved the furniture back in.  It is however, more than halfway done now. 

Done:
  • Rip up green carpet
  • Paint floors
  • Change light fixture
  • Add picture ledges on one wall
  • Add shelves on stripe wall
  • Hang curtain rods
  • Paint TV Stand
  • Paint bookcase
To Do:
  • Buy new couch and ottomans
  • Hang curtains
  • Finish TV Stand
  • Add Rugs
  • Add doors to Expedit
  • Make pillows
  • Finish accessorizing
Goal #4 Finish Entry Way - 100% Complete


To Do: Nothing

Goal #5 Hallway - 100% Complete


To Do: Nothing

Goal #6 Hall Closet - 80% Done


I turned this closet into a "laundry only" closet.  All the toiletries have been moved into the office closet.

To Do:
  • Paint laundry baskets
  • Cover ironing board with a different fabric  

Goal #7 Paint Exterior of House - 10% Complete


If you read my blog, you know that we attempted to paint our house and failed miserably.  You can read more about it here.  We are planning to replace the siding on the front and add a deck next month.

To Do:

  • Build deck
  • Replace siding 
  • Paint new siding Gray

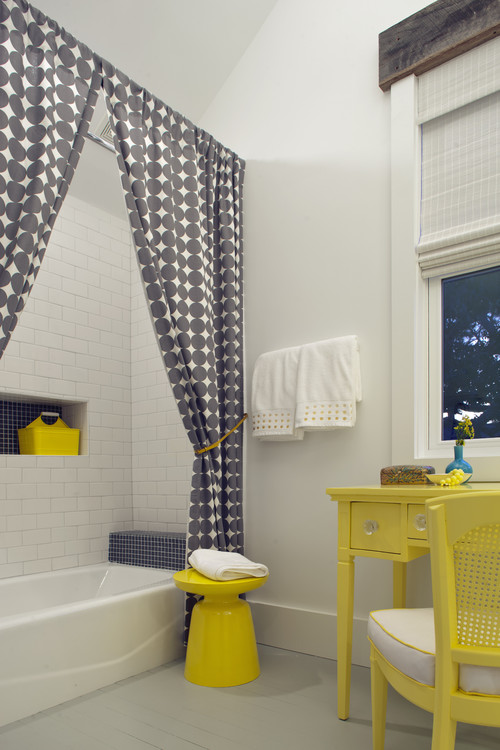
Goal #8 Start Bathroom - 1% Complete


If you go back to my original 2013 Home Goals, it does say start the bathroom which I have.  So I guess I did accomplish that.  I have only removed the wallpaper on 90 percent of one wall.  You can see above that I was testing out chalkboard paint for in here.  I ultimately decided against it.  The original post mentions at least replacing the sink and taking out the glass doors.  I haven't got to those things yet.  I am way ahead of schedule on the projects so I may be able to get to those things.

To Do:
  • Finish removing wallpaper
  • Paint ceiling and walls
  • Add board and batten to walls
  • Replace floor
  • Take shower doors off and replace with shower curtain
  • Replace sink
  • Take out above the toilet cabinetry for floating shelves
  • Replace mirror
  • Replace vanity light and overhead light
I am really pleased with how much I have got done.  I have 5 months to finish the living room/dining room, make some progress in the bathroom and replace the siding on the front of the house.  I hope that I can do it.  

Can you believe I got most of my goals completed already?  Did you set home goals and how is your list going? 

Friday, July 26, 2013

Weekend Creativity Round Up {No. 2}

Welcome to my new and improved link party.  The Weekend Creativity Round Up.


Some party rules:

*Please follow If It's Not Baroque in some fashion via Google Friend Connect, Email, or Bloglovin. 

*Please link to a specific post not just your blog
(Anything goes - home decor, recipes, crafts, etc. that is made by you)

*Link up as many projects as you want, old or new.  As long as you haven't linked it here before.

*Please do not link up giveaways, Etsy shops or other link parties.

*Please, please, please put a link back to my blog.  I am helping you get more exposure, please help me get some exposure. 
(use the button above or a text link)

*Please visit some of the other links and leave a few comments. 

Every week, I will pick a few of the links that I like the most and will feature them the day before the next party.

I can't wait to see what you all have been up to!

Thursday, July 25, 2013

Round Up #1 Features

I would like to thank everyone who linked up to my new link party.  I was worried that changing the day would affect how many people would link up.  It didn't at all.  

There are some really creative people out there and I love being inspired by all of you.  

Here are my favorites for the week:


Boys Room by She's Crafty

Vintage Kitchen Cart Makeover by May Richer Fuller Be

Cabinet Door Chalkboard by Artsy VaVa

Reclaimed Wood Walkway by Exploring Domesticity


Cake Spade {Lemon Layer Cake}
Lemon Layer Cake by Lilikoi Joy

If you have been featured, please grab my button. (You can find the button code in the tab above).


I will be pinning the features on my Pinterest page.  If you would like to pin something, please click through to the original source before pinning.  Thanks.

Thanks again to all who linked up last week.  Be sure to stop back tomorrow to link up your projects for a chance to be featured next week.

Wednesday, July 24, 2013

The Trials and Tribulations of a Painted Floor

This is going to be a very long wordy post.  I apologize in advance, but if you ever wanted to paint a wood floor you should definitely read this post.

Last winter while watching HGTV, it dawned on me that we should paint our living room/dining room floor.  We had originally planned to put laminate flooring in like we have in several rooms already.  It is easy to install, but it was going to cost around $500 to do the whole room.

Painting the floor seemed like a no brainer because I love to paint (if you haven't already figured that out).  I will paint anything and it is only going to cost about $100.  The decision was easily made to paint our floor in the summer.

I was so excited to get rid of the ugly green stained carpet (see below).  I waited patiently for almost 7 months before we were able to finally do it.


While I waited, I researched painting wood floors for months.  There are tons and tons of websites explaining the steps of painting a floor.  Not one site was the same and everyone had a different method.  So I had to come up with a plan that I thought would work the best.  We went into it thinking if it didn't work, we could always put the laminate over top of the floor as we originally planned to do.

The main reason it took so long to get started on this project was because our living room is centrally located in our house.  You can't get to the kitchen, bathroom and bedroom without going through the living room.  We were going to have to stay with someone during the process.  My husband wanted to pitch a tent in the yard and sleep there, but we would have to walk to his parents house to use the bathroom.  (They live across the street, but you have to walk down a big hill to get to it.)  No thanks.  We couldn't stay with his parents because we have 4 dogs and they don't have a fenced in yard.  Letting 4 dogs out at one time on leashes is not a good idea.  Especially when you have 3 rambunctious min pins.  Not happening.  My parents live about 40 minutes away and have a fenced in yard so that was the best option.

Last month, we decided it was time.  Summer is flying by so we had to get it done.  We packed up the dogs and a few weeks worth of clothes and moved out.


I spilled paint in the middle of the floor a couple days before we moved out.  Whoops!  I tried to hide it in this picture with paper towels.  Thankfully, we were going to rip out the carpet any ways.


Preparing the floor is by far my least favorite thing to do when it comes to renovations.  Crawling around on the floor, pulling up staples and tack strips is not my idea of fun.  I am getting too old for that.  We spent one whole day ripping out carpet and preparing the floor.  This step is crucial when it comes to painting a floor.  If we were putting laminate down, you can miss a staple here and there.  Not the case here.  I meticulously crawled around the floor ,inch by inch, to make sure I got every staple out.  The floor was in pretty bad condition.  Painting it was the only way to go.

After the floor was prepped, you would have thought we were ready to start priming and painting, but we had a whole list of things we wanted to do in the room before the floor was painted.  That was when the plan kind of fell apart.  I allotted a day for installing light fixtures, curtain rods, and shelves on the walls.  It seemed like each one of those projects turned into a bunch of other projects and things weren't working at all.  The walls were getting all chipped up.  I was completely frustrated and frazzled by all the complications that we decided to stop and come up with a new plan.  My husband had to go back to work the next day so we had to take the rest of the week off before we could start again.  

I decided to repaint the walls and trim which I hadn't planned on doing.  I bought shelves from Ikea to install on the black and white stripe wall.  They were a pain to install so my husband decided to build shelves from scratch instead.  We were now a week behind schedule and still had all of these things to do before we could get back to the floor.


We finally got everything installed and were able to prime the floor.  It was finally starting to look good. 

I used Zinsser BIN shellac based primer-Sealer.  1 gallon was enough to do 2 coats in the living room and hallway.  We waited the recommended 1 hour between coats and let it dry overnight before moving forward with paint.  


The next day we painted the floor with black interior paint.  We used flat paint on the first coat.  When we walked on the flat paint (after it dried) it showed a lot of foot prints and such so we thought it wasn't durable enough.  We switched tosemi gloss paint for the 2nd and 3rd coats.  I used Valspar Ultra interior paint in Dark Kettle Black.

During my research, I read that you shouldn't polyurethane over latex paint for several days to let the paint cure.  My husband went back to work and we waited 5 days before we continued onto the next step.

2 weeks have gone by and now we were ready for the final step.

This last step may scare off most people who are thinking about painting their floors.  Especially if you don't have time to wait around for paint to dry.  This step was by far the most stressful and if I had to do it over again, I probably wouldn't do it.  

We decided to use Minwax super fast-drying polyurethane for floors in clear gloss.  We chose this polyurethane because it states that you don't have to sand in between coats.  After the 1st coat, re-coating has to be done in 6 to 8 hours.  If you wait 10 hours or more, you have to sand before the next coat.  

We drove 40 minutes back to my parents house to wait for the floor to dry.  In the evening, we drove 40 minutes back to our house only to find that the floor was nowhere near being dry enough to re-coat.  We started to freak out.  

What do we do now?  If we wait, we will have to sand and we didn't want to do that.  We thought maybe something was wrong with this product.  I looked on the Internet to see if anyone else had the same problem and I found tons of complaints about this polyurethane not drying.  Great!  It is called super fast drying.  Good thing we didn't buy regular polyurethane or we would still be waiting for it to dry.  We thought about buying a different polyurethane, but we would still have to wait until this coat completely dried to apply another coat of something else.  We thought about aborting the whole thing and buying the laminate that we wanted originally.  We were there until 3 AM trying to figure it all out.  We ultimately decided to leave and come back the next day to see if it was dry.  We think that because it was extremely humid outside it was taking way longer for it to dry.

The next day we were expecting the worst, but when we got there it was completely dry.  It was a huge relief.  We decided to skip sanding it and put another coat on to be done with it.  They recommend that you wait 7 days for the floor to cure before you move furniture onto the floor.


Seven days later, this is what our floor looked like and it was completely dry.  We were so happy.  It looks fantastic and we can finally move back in.

The pros of doing this project:


  • It is really cheap to do.
  • I like the way it looks better than the laminate that we wanted.


The cons of doing this project:


  • There is a lot of waiting for primer, paint and polyurethane to dry. 
  • There is no way to live in a house while this is going on.  
  • You really should wait 30 days for the polyurethane to cure.  7 days isn't really enough time.  We have found that heavy objects leave a mark in the polyurethane because it isn't completely cured.  

Would I recommend others take on this project?  Only if you haven't moved into your house yet or if you are doing it in a room that you can go without using for about a month.

We don't plan on living in our house forever so this was a good solution for us.  It looks good and will probably be durable enough while we live there.  We may have to re-polyurethane it when we move out to fix the marks that our furniture is leaving on the floor.

I am glad the whole process is over and we are back to normal in our house.  The living room/dining room is starting to look like the rest of the house.  Fun and different.  I hope you will come back to see how the room turns out.

I'm linking up to these parties: The Real Housewives of Riverton, Polkadots on Parade, Green Willow Pond,  This Silly Girl's Life, Someday Crafts, DIY by Design, Southern Lovely, Savvy Southern Style, Seven Thirty Three, The 36th Avenue, A Creative Princess, No Minimalists Here, 52 Mantels, Seven Alive, Live Laugh Rowe, Mom on Timeout, All Things With Purpose, What's Cooking Love, The Shabby Creek Cottage, A Delightsome Life, I Gotta Create, House of Hepworths, The Crafty Blog Stalker, Katharine's Corner, The Yellow Birds Decor, A Gimpse Inside, Domesblissity, Gingerly Made, Artsy Fartsy Mama, Embracing Change, Reasons to Skip Housework, Somewhat Simple, Living Well Spending Less, Domestic Superhero, Made in a Day, French Country Cottage, Redoux Interiors, Craftionary, Happy Hour Projects, Design, Dining and Diapers, Create Craft Love, Lamberts Lately, Be Different Act Normal, Or So She Says, It's Overflowing, Too Much Time, Serenity You, Classy Clutter, Twigg Studios, Suburbs Mama, I Heart Naptime, Nifty Thrifty Things, DIY Showoff, It's So Very Cheri, I Should Be Mopping the Floor, Our Delightful Home, Serendipity and Spice, I Gotta Try That, The Dedicated House, Creating My Way to Success, Skip to My Lou, Craftomaniac, Claire Justine OxOx, Rain on a Tin Roof, Flamingo Toes, DIY Home Sweet Home, Say Not Sweet Anne, Making the World Cuter, Mad in Crafts, Between Naps on the Porch, By Stephanie Lynn, My Repurposed Life, Crafts a la Mode, 504 Main, Young and Crafty, Chic on a Shoestring, Liz Marie Blog, The Pin Junkie, Shabby Nest, Five Days 5 Ways, Common Ground, A Peek into My Paradise, Tatertots and Jello, The Blackberry VineA Stroll Thru LifeMy Uncommon Slice of SuburbiaKathe With an EDukes and DuchessesLadybug BlessingsSalt TreeHomeworkNot Just a HousewifeA Bowl Full of LemonsVMG206Pursuit of Functional HomeHouse on the WayThe Winthrop ChroniclesCoastal CharmElizabeth and CoSugar Bee CraftsSarah Lynn's SweetsNew Nostalgia, A to Z CelebrationsHope StudiosThe DIY DreamerThe Blissful Bee,                     
    

Tuesday, July 23, 2013

Instagram Photo Display Wall {Hallway Reveal Part 2}

Everyone is into Instagram right now.  Unfortunately, I am not.  I have an account, but I don't use it because I have an old iPhone that takes crappy pictures.  I could use my iPad, but I always forget about using Instagram.  I do however take pictures with my cameras.  The photographer in me still exists.  

I had some of our pictures displayed on our dining room table.


I have another idea for the table so the photo heart had to go.


We had this blank wall at the end of the hall and I thought it was a perfect place for the photos.  I came across The House of Smiths Instagram display wall and loved the idea.  So that is what I did.


I tweaked the idea a little.  Instead of weaving the string back and forth, I just did individual rows with my hot pink string.


Also, instead of using molding attached with command strips, I had my husband attach 1x2s directly to the wall.


It is a really simple project.  After my husband attached the wood rails, it only took me a couple hours to drill all the holes for the screw eye hooks, screw the hooks in and thread the string through.


I attached the pictures with these mini craft clothes pins (Amazon) that I spray painted fluorescent yellow.


You may have noticed that I added this Orb light fixture in the hall as well.  It was a very dark spot in our house and needed some lighting.  I made the fixture with embroidery hoops and a Hemma Cord from Ikea.  Very easy to make.

Because the hall doesn't have a switch for a light, I found the coolest gadget to turn the light off and on.


This is an indoor wireless remote control with three outlets (Amazon).  I used 1 in the hall, 1 for our orange lamps in the living room and the extra 1 is for an upcoming project for the dining room.  It is really cool and only $20.

Well, that is the hallway.  It is super small, but still reflects our personality that the rest of the house has.  

If you missed part 1 of the hallway, check it out here.

I'm linking up to these parties: Green Willow PondThis Silly Girl's LifeSouthern LovelySavvy Southern StyleSeven Thirty ThreeThe 36th AvenueA Creative PrincessNo Minimalists HereSeven AliveLive Laugh RoweWhat's Cooking LoveA Delightsome LifeI Gotta CreateKatharine's CornerThe Yellow Birds DecorReasons to Skip HouseworkSomewhat SimpleLiving Well Spending LessDomestic SuperheroRedoux InteriorsCraftionaryLamberts LatelySerenity YouClassy ClutterTwigg StudiosSuburbs MamaDIY ShowoffIt's So Very CheriI Gotta Try ThatThe Dedicated HouseCraftomaniacClaire Justine OxOx,Someday CraftsPolkadots on ParadeDIY by DesignSeven Thirty Three, 36th AvenueThe Blissful Bee, 52 MantelsMom on TimeoutAll Things with PurposeThe Shabby Creek Cottage,  House of HepworthsThe Crafty Blog StalkerDomesblissityGingerly MadeArtsy Fartsy MamaEmbracing ChangeMade In A DayBe Different Act NormalOr So She Says, It's OverflowingToo Much TimeI Heart Naptime, Nifty Thrifty Things, I Should Be Mopping the Floor, Sumo's Sweet Stuff, Sew Can DoLines AcrossHomemaker on a DimeAlderberry HillWatch Out, MarthaHuckleberry LoveRain On a Tin RoofMy Uncommon Slice of SuburbiaA Stroll Thru LifeThe Blackberry VineTaylor MadeKathe With an EFrench Country Cottage,  Happy Hour ProjectsCreate Craft LoveThe Frugal GirlsDesign, Dining and Diapers, Bacon Time With Hungry Hypo, Thirty Handmade Days, Serenity Now, Whipperberry, Just Us Four, Truly Lovely, What About, Cheerios and Lattes, Six Sisters Stuff, Funky Junk Interiors, Between Naps on the PorchSkip to my LouCreating my way to Success, Our Delightful Home, The Real Housewives of Riverton,